Exporting, Importing, and Merging Calendars
BusyCal can export in .ics and .csv format, and supports importing calendars in .ics format.
Exporting Calendars to ICS
BusyCal makes it easy to export your calendars to standard formats that can be used with other calendar applications or for backup purposes. Exporting to ICS format creates a standard calendar file that's compatible with virtually all calendar applications.
BusyCal supports exporting calendars & events in two formats:
- Calendar File Format (
.ics) – The standard format for sharing calendar event data with others or importing into other calendar apps. - Spreadsheet Format (
.csv) (new in v2025.1.1) – Ideal for analyzing events in spreadsheet applications like Excel, Numbers, or Google Sheets. This format provides a structured table of event details, allowing for sorting, filtering, and custom reporting.
To export a calendar in .ics format:
- Select the desired calendar from the left sidebar.
- Choose File > Export > Calendar File (.ics).
- Select a location and click Export.
Exporting as .csv
To export as a .csv file:
- Choose File > Export > Spreadsheet (.csv).
- Select the calendars you want to export.
- Click Export to save the file.
Additional Export Options
- Enable "Export "My" Private Fields" to export properties that are local to this device and private to you, such as:
- My Notes – Private notes attached to events.
- My Tags – Custom event tags.
- My URL – Any custom links associated with events.
How to Import ICS Files (iCal Files)
import ics file add calendar from file import calendar events import ical file load calendar from ics import events from file restore calendar from backup import calendar backup add ics to calendar import external calendar importing calendar data calendar file import ics calendar import how to import ics file how to import calendar file importing ics calendar file add ics calendar import calendar from file ics file import import ics calendar importing calendar backup loading ics file into busycal importing events from ics file importing calendar importing ical file import calendar export file add events from file calendar import guide ics import instructions importing calendar data from ics calendar import steps adding ics calendar to busycal import ics into busycal
BusyCal makes it easy to import events from standard ICS calendar files (the universal calendar format), allowing you to seamlessly add events from other calendar applications, downloaded calendar files, or backups.
When importing an .ics file, you have two options:
- Create a new calendar containing just the imported events
- Add the events to an existing calendar already set up in BusyCal
Option 1: Create a New Calendar from ICS File
To import an .ics file as a new standalone calendar in BusyCal:
- Select File > Import from the menu bar
- Navigate to and select the
.icsfile you want to import - If the Import events into section isn't visible at the bottom of the dialog, click Options to display it
- Select the New Calendar option
- Click Import to complete the process
Your imported calendar will appear in the left sidebar with all events from the ICS file.
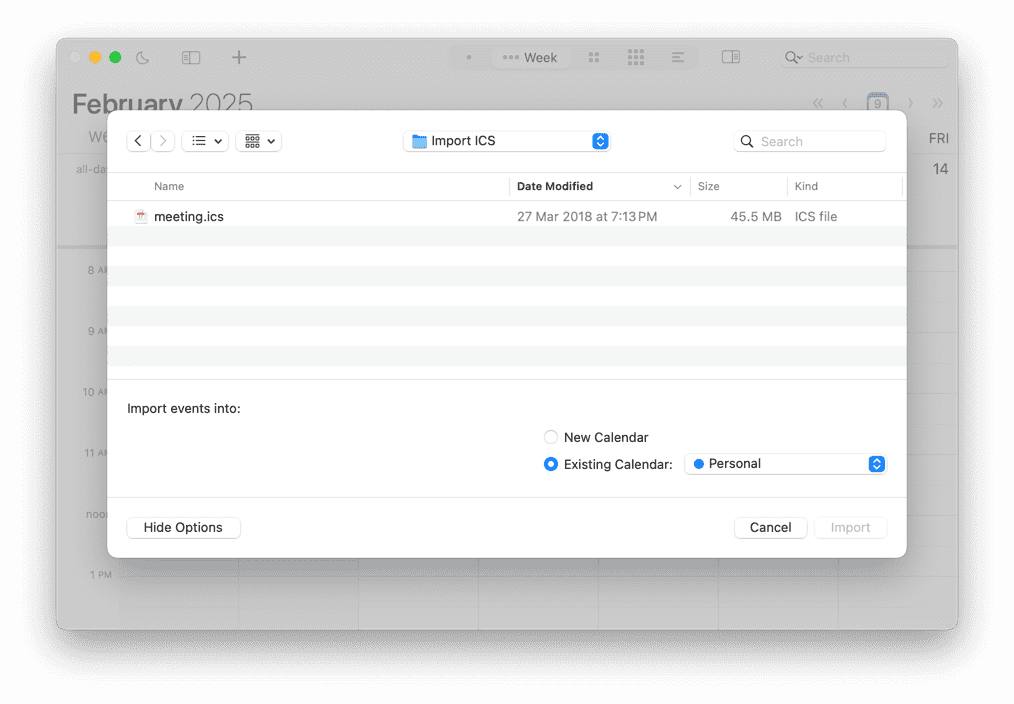
Option 2: Import ICS into an Existing Calendar
To add events from an ICS file to a calendar you already have in BusyCal:
- Select File > Import from the menu bar
- Navigate to and select the
.icsfile you want to import - If the Import events into section isn't visible, click Options to display it
- Select Existing Calendar and choose which calendar to add the events to
- Click Import to complete the process
Import ICS to Cloud-Based Calendar
To import an ICS file to a cloud-based calendar (iCloud, Google, Exchange, etc.):
- First create a new calendar on the server by choosing File > New Calendar > Server
For Google Calendar imports: You must create the new calendar in Google Calendar's web interface first. After creating it, return to BusyCal, choose View > Refresh Calendars, and then check the new calendar in the left sidebar to subscribe to it.
- Now choose File > Import and select your
.icsfile - Click Options if the import options aren't visible
- Select Existing Calendar and choose the cloud calendar you just created
- Click Import to add the events to your cloud-based calendar
Merging Calendars
You can merge multiple calendars into a single calendar by exporting calendar A and importing it into calendar B. Here's how:
- Export calendar A by selecting it in the left sidebar and choosing File > Export > Calendar File (.ics), and save it to your desktop. Then delete calendar A from BusyCal by Control-clicking it and choosing Delete from the contextual menu.
- Choose File > Import and select the file you exported in step 1. If the "Import events into" section does not appear at the bottom of the dialog, click Options to display it. Select Existing Calendar and choose calendar B. The events from calendar A are added to calendar B.
After merging the calendars, you can remove any duplicate events by choosing Help > Find Duplicates.
Export Calendar to PDF
export calendar pdf save calendar as pdf print calendar to pdf export calendar print calendar export calendar pdf format print calendar to file save calendar view as pdf export calendar for printing save calendar in pdf format pdf export calendar view export calendar as document pdf calendar output export calendar to document save calendar snapshot pdf calendar printout export pdf of calendar export calendar to file calendar pdf export export day view to pdf export month view to pdf
While BusyCal doesn't have a direct "Export to PDF" option, you can easily save your calendar as a PDF using the built-in printing function:
- Set up your calendar view exactly as you want it to appear in the PDF (Day, Week, Month, or List view)
- Choose File > Print (or press ⌘-P)
- In the Print dialog, click the PDF button in the lower-left corner
- Select Save as PDF from the dropdown menu
- Choose a location to save your PDF file, give it a name, and click Save
This creates a PDF document that preserves your current calendar view exactly as it appears on screen, ideal for sharing or archiving your calendar.
PDF Export Options
When using "Save as PDF", you can customize what appears in your PDF export by:
- Choosing your preferred view (Day, Week, Month, or List) before printing
- Using the Show Details button in the Print dialog to access these options:
- Text size - Choose Small, Medium or Large text
- Pages to print - Specify how many Months, Weeks, or Days to include
For optimal results when exporting a task list to PDF, use the List view and set up a smart filter that displays only tasks.