Using BusyCal with Google
Google Calendar is a free service for Google users that lets you sync and share calendars. BusyCal can connect to Google Calendar, using it to sync calendars across your devices and share them with others.
Syncing with Google Calendar
BusyCal offers seamless Google Calendar sync capabilities, allowing you to synchronize your events, tasks, and calendars across all your devices through Google's powerful cloud service.
google calendar sync, sync busycal with google, google calendar integration, subscribe to google calendar, google calendar subscription setup google calendar in busycal, connect busycal to google, google sync settings, synchronize calendars with google, google calendar account setup
To sync BusyCal with Google Calendar, do the following:
Before you proceed, please note that Google authentication will fail if your system time is incorrect. Open System Settings > General > Date & Time and ensure Set time and date automatically is checked.
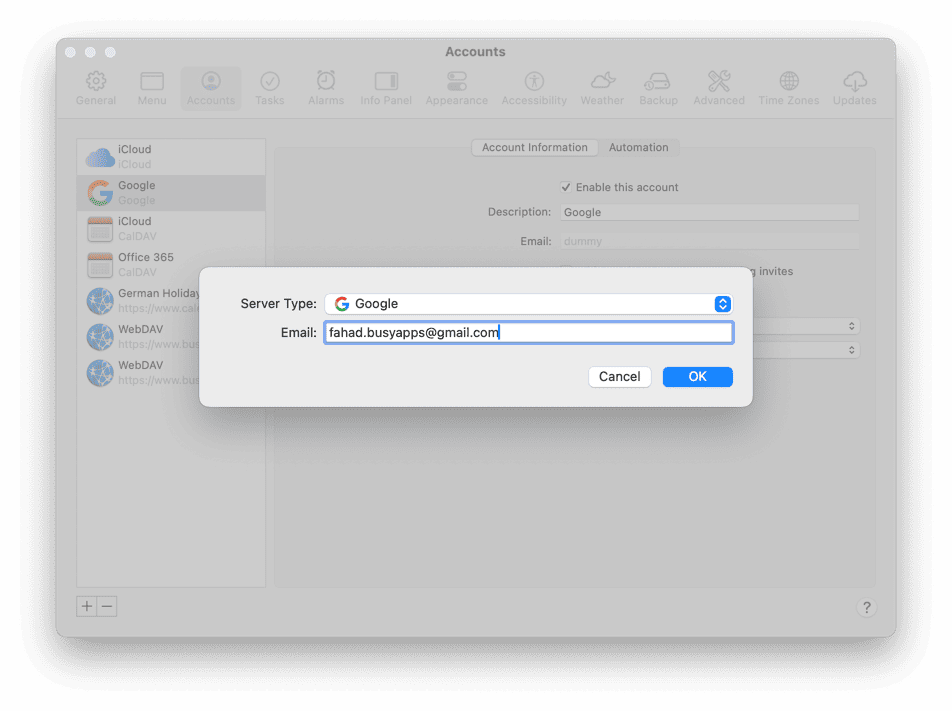
- Choose BusyCal > Settings > Accounts.
- Click the
[+](plus) icon to add a new account, from the lower left part of the dialog. - Choose Google from the Server Type pop-up menu, enter your Google email address, and click OK.
- In the window that appears, enter your Google email address and click Next to sign-in, you'll be presented with the following greeting once you do. Click Continue.

- Next, you'll be presented with a long list of permissions. You must click Select all on this screen and then click Continue. Unchecking any option will break the authentication flow and BusyCal will not be able to perform sync. To act as a calendar replacement, BusyCal requires all of these permissions to allow you to manage your calendar events, meetings and related scheduling tasks.
You must grant ALL permissions when prompted by Google. Unchecking any permission will prevent BusyCal from syncing properly with your Google Calendar. These are all required permissions, needed for the various calendaring functions to work correctly.

- Finally, you should see a confirmation screen once authentication has completed. You may close the browser tab at this point.
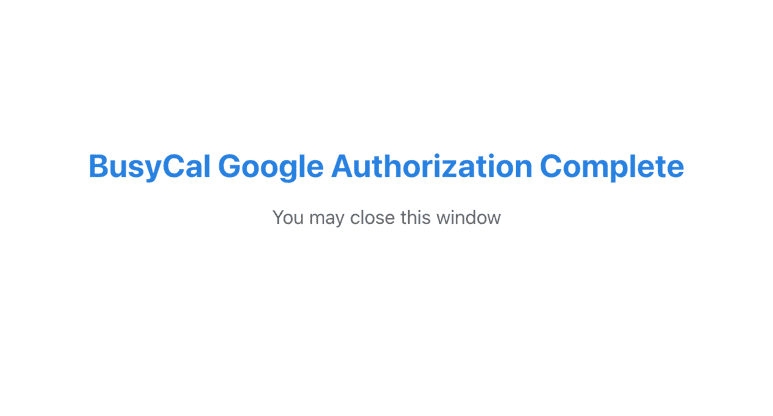
BusyCal should begin syncing with Google Calendar.
Syncing with iCloud and Google Calendar
BusyCal can sync with both iCloud and Google Calendar. But you cannot sync iCloud calendars with Google Calendar or vice versa.
Instead, you can host some calendars on iCloud and some on Google, and configure BusyCal and your iOS devices to sync with both services. Note the following:
- If you want to share calendars with other iCloud users, you must host the calendars on iCloud.
- If you want to share calendars with other Google users, you must host the calendars on Google.
- If you want to sync an iOS device with iCloud or Google, see Syncing BusyCal with an iOS Device.
Sharing Calendars with Others through Google
BusyCal enables you to share calendars with other Google users. Once each user has configured BusyCal to sync with their personal Google account, you can share calendars with each other through Google. When a calendar is shared through Google, events can be edited by any user and changes sync between them.
Share a Calendar with Other Google Users
For example, Fred syncs to his personal Google Calendar account, and Mary syncs to her personal Google Calendar account. Then Fred shares a calendar with Mary using the Google Calendar sharing interface, so that the calendar shows up on Mary’s Google Calendar. Once there, it syncs to Mary’s Mac. Mary can make changes to that calendar on her Mac and those changes sync back to Fred’s Mac through Google Calendar.
Google Calendar Sharing
In this example, we start out with Fred and Mary each syncing BusyCal with their personal Google Calendar accounts, but they are not yet sharing calendars with each other.
Fred can share his calendar on Google Calendar with Mary by logging into Google Calendar on the web and clicking the three vertical dots next to the calendar name and then Settings & Sharing.
Fred then enters Mary’s Google Calendar account ID in the Shared with section by clicking on Add people and groups, and sets the Permission Settings
(Make changes and manage sharing, Make changes to events, See all event details, or See only free/busy time) for the calendar.
Once Fred has shared his calendar with Mary, it shows up on Mary’s Google Calendar, and from there it automatically syncs to BusyCal on Mary’s Mac.
Now Fred and Mary can both make changes to Fred’s shared calendar in BusyCal and the changes sync back and forth through Google. This process can be repeated with other calendars that Fred or Mary want to share with each other or with other Google Calendar users.
Share a Google Calendar with Everyone
You can also share a Google calendar as a read-only public calendar, available to anyone who uses an app or web service that accepts webcal URLs. For instructions, see Create & manage a public Google calendar.
Shared Calendar Messages
When sharing calendars with others, there are two options you may want to enable, for keeping track of changes to events on shared calendars:
-
First, in BusyCal > Settings > Advanced > Other, select Confirm changes to events on shared calendars if you want to display a warning when you edit or delete an event on a shared calendar.
-
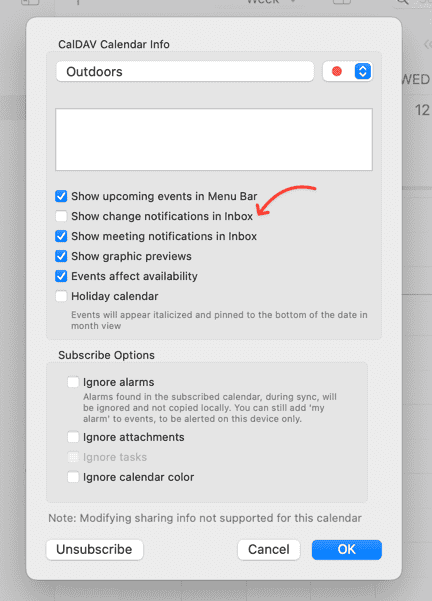
Second, in the Calendar Info dialog for any given calendar (which you can display by double-clicking the calendar name in the calendar side panel), select Show change notifications in Inbox to display a badge on the app icon and a message in the Inbox when events are added or changed by others, or deselect it to avoid seeing badges and Inbox notifications for that calendar.
- Open BusyCal > Settings > General and select Inbox Notifications under Dock badge count, if desired.
Hosting calendars on Google
Google functions as a CalDAV server that hosts your calendars and syncs them with client apps. BusyCal and the built-in Calendar app on macOS and iOS are CalDAV clients that sync with Google.
This means any data you create on a Google calendar using the built-in Calendar app on macOS or iOS will sync to BusyCal through Google, and vice versa. As long as you are hosting all your calendars on Google and have all client apps configured to sync with the same Google account, all your calendar data will remain in sync.
Calendars Must Be Hosted on Google Calendar
All calendars you want to sync between your Macs, iOS devices, and other users must be hosted on Google Calendar. You cannot sync calendars from other sources (On My Mac, iCloud, Exchange, etc.) to Google.
If you have any existing calendars hosted elsewhere that you want to host on Google Calendar, you can move them to Google Calendar or merge them with an existing calendar in Google Calendar, as follows.
Merge with a Calendar on Google Calendar
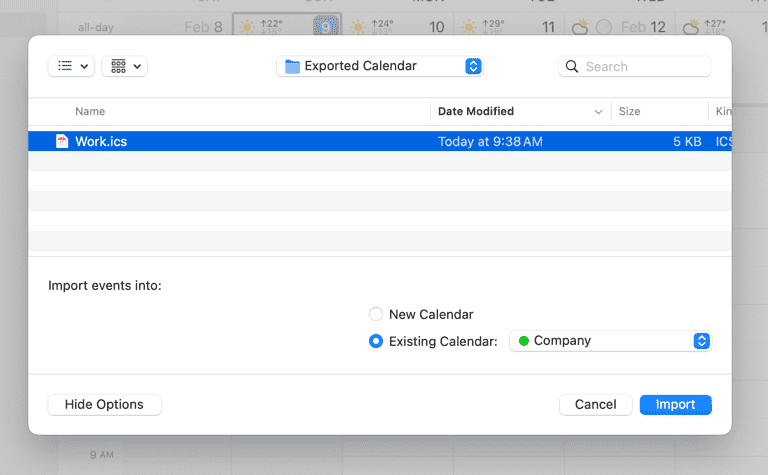
For this example, let’s say you have a local calendar called “Work” that you want to merge with an existing calendar on iCloud called Company. Here’s how to do it:
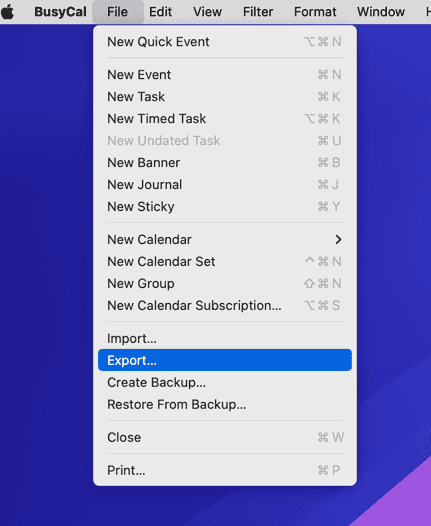
- Export the Work calendar by selecting it in the left sidebar and choosing File menu > Export > Calendar File (.ics), and save it to your desktop. Then delete the Work calendar from BusyCal by control-clicking on it and choosing Delete from the contextual menu.
- Choose File menu > Import and select the file you exported in
step 1. If the Import events into section does not appear at the bottom of the dialog, click Options to display it. Select Existing Calendar, and choose the Company calendar (which is hosted on iCloud). BusyCal adds the events from the Work calendar to the Company calendar on iCloud.
After merging the calendars, you can remove duplicate events by choosing Help > Find Duplicates.
Move a Calendar to Google
For this example, let’s say you have a local calendar hosted on your Mac called “Work” that you want to host on Google. Here’s how you can move it to Google:
- Export the Work calendar by selecting it in the left sidebar and choosing File > Export > Calendar File (.ics), and save it to your desktop. Then delete the Work calendar from BusyCal by Control-clicking on it and choosing Delete.
- Login to Google Calendar on the web, click the “Create” link below “My calendars” and create a new calendar called “Work.”
- In BusyCal, choose View menu > Refresh Calendars, and then subscribe to the new Work calendar on Google by checking it in the left sidebar.
- Choose File menu > Import, and select the file you exported in step 1. On the bottom of the import dialog, select the option to Import events into Existing Calendar, and choose the Work calendar (which is hosted on Google). This will add the events from the old Work calendar to the new Work calendar on Google.
Google Meets Conference Calls
You can add one-click Google Meets meetings to events / invitations. Simply open BusyCal Settings > Info Panel and make sure you have checked the Google Meets option. You should now see a Add Meeting button appear in the Info Panel when editing events. Clicking on this button will automatically create a conference call (using Google Meets) and add it to the event.
Google Limitations
Google places certain limits on calendar data, which may affect how you use BusyCal or which service you choose for syncing calendars.
The following limitations exist when syncing BusyCal with Google Calendar.
Calendar Limitations
google task not syncing due time, google task missing due time, google task repeat recurrence option, google task cannot set priority, google task cannot add alarm, google calendar limitations, google sync limitations, google calendar task limitations, google task properties not syncing, google calendar does not support task due times, google calendar third party app limitations, google calendar api limitations, google tasks missing features, google calendar extended properties not supported, google calendar attachment not supported, google calendar graphics not supported, google calendar url field not supported, google calendar floating time not supported, google calendar separate timezone not supported, google calendar journal sticky not supported, cannot create calendar in busycal google
-
Syncing Google Task Lists is supported; however, only the following task properties sync with Google: title, due date, and notes. Unfortunately, Google does not allow third-party apps to sync additional properties such as due times, recurrence, alarms, or priorities.
-
BusyCal, however, lets you set due times, durations, and other properties, and these will sync across your devices running BusyCal via our Extended Sync implementation.
-
Keep in mind that these extended properties will not appear in Google Calendar itself due to its current limitations.
-
Separate timezones cannot be set for start / end dates from BusyCal. Use Google Calendar to enable this per event manually.
-
Graphics are not supported.
-
URLs do not sync by Google Calendar so this field is hidden within BusyCal.
-
Attachments are not supported.
-
Journals and Stickies sync between BusyCal clients through Google, but they do not appear on Google Calendar in a web browser.
-
You cannot create new calendars from within BusyCal. You must create calendars on Google.
-
Floating Time events are not supported.
-
Colored Labels are supported, however Custom Named Colored Labels from Google Education Accounts are not supported as Google does not sync this information with 3rd party apps.
For more information, see Google Calendar Help: Troubleshoot CalDAV.
Alarm Limitations
google alarm limitations, google alarm issues, google alarm sound, google calendar alarm
- Email alarms are delivered by Google and not by BusyCal. This prevents duplicate email alarms from being delivered by both Google and BusyCal. Be aware, however, that Calendar on macOS delivers email alarms if it is syncing with your Google account, which will result in duplicate email alarms.
- SMS alarms are not supported.
- Sound alarms are not supported. Google replaces sound alarms (when created using BusyCal) with message-only alarms.
Meeting Event Limitations
- For best results, you should create meetings on your primary Google calendar. This will ensure that the meeting invitations are delivered to attendees by Google and that the attendee responses are properly received and processed by Google.
- Attendees cannot add meeting invitations to secondary Google calendars. You can add and accept meeting invitations only on your primary Google calendar.
- Meeting invitations will not be delivered to attendees if you create the meeting in BusyCal on a secondary Google calendar. If you want to invite attendees to a meeting on a secondary Google calendar, you must create the meeting on Google Calendar in your web browser.
- If an attendee receives a meeting invitation via email addressed to their non-Google email address and adds the meeting to their Google primary calendar, the attendee email address in the meeting reply is changed to their Google email address and the meeting reply is sent to the organizer from Google using the attendee’s Google email address. Since the attendee email address in the reply does not match the original attendee email address, the attendee’s status will probably not be recognized and updated by the organizer. We have listed some trouble-shooting tips here.
⚠️ Troubleshooting
cannot log into google calendar, fix google calendar sync, google not syncing, google authentication failed, google calendar connection issues, google account sync problems, google calendar won't connect, resolve google sync errors
If your Google Calendar account won't sync or connect to BusyCal, there are several common causes and solutions to resolve these synchronization issues.
🛠️ Verify System Date & Time Settings
Google Calendar authentication will fail if your system's date and time don't match the actual current time. This is a security requirement that prevents connection issues:
- Open System Settings > General > Date & Time
- Ensure Set time and date automatically is enabled
- If the setting is already enabled, try disabling and re-enabling it to force a time sync
- Restart BusyCal and attempt to reconnect your Google account
🛠️ Check Firewall and Network Security Settings
Network blocking utilities and firewall applications can prevent BusyCal from communicating with Google Calendar servers. Verify that network access is not being restricted:
macOS Built-in Firewall:
- Open System Settings > Security & Privacy > Firewall
- Click Firewall Options... to view application-specific settings
- Ensure BusyCal shows "Allow incoming connections" in the list
- If BusyCal is not listed or shows as blocked, add it or change the setting to allow connections
Third-Party Network Blocking Utilities: If you're using any network blocking or firewall applications, they may be preventing BusyCal's network communication. Common applications include:
- Little Snitch
- Objective-See LuLu
- TripMode
- Hands Off
- Vallum
- Radio Silence
- Norton Security
- Data Cever
- NetBarrier
To resolve network blocking issues:
- Check your firewall application's rules and logs for blocked BusyCal connections
- Configure the application to allow BusyCal's outgoing communications
- Ensure BusyCal is permitted to connect to Google's servers (*.google.com, *.googleapis.com)
- Temporarily disable the firewall application to test if it resolves the sync issue
- Add explicit allow rules for BusyCal if the test confirms the application is blocking connections
Network and VPN Issues:
- Temporarily disable VPN connections during Google authentication
- If using corporate networks, verify that CalDAV traffic (port 443/HTTPS) is not blocked
- Test from a different network (mobile hotspot) to rule out network-specific restrictions
🛠️ Fix Missing or Insufficient Permissions
Google Calendar sync failures often occur when BusyCal doesn't have the required permissions to access your calendar data. BusyCal needs full read/write access to function as a complete calendar replacement.
To resolve permission issues:
-
Remove the existing account:
- Open BusyCal > Settings > Accounts
- Select your Google account in the left sidebar
- Click the minus [-] button at the bottom to remove the account
-
Re-add the account with correct permissions:
- Click the plus [+] button to add a new account
- Select Google from the server type menu
- Enter your Google email address and follow the authentication flow
-
Grant all required permissions:
- When Google's permission screen appears, you must select "Select all"
- Do not uncheck any permissions, as this will break the sync functionality
- Click Continue to complete the authentication
You must grant ALL permissions when prompted by Google. Unchecking any permission will prevent BusyCal from syncing properly with your Google Calendar. These are all required permissions, needed for the various calendaring functions to work correctly.
🛠️ Clear Stale Keychain Items
If the above steps don't resolve the issue with connectivity, the problem may be caused by stale OAuth keychain items or browser cache. Follow these steps to clear stored authentication data:
Browser and System Restart:
- Restart your Mac to clear any cached authentication data
- If using Firefox or another browser besides Chrome/Safari, temporarily switch to Chrome as your default browser
- Quit and relaunch your web browser
Clear Google Account Connections:
- Visit Google Account Connections
- Remove BusyCal from the list if it appears there
- For Google Workspace accounts, visit Google Admin Console and set BusyCal access to "Trusted"
Remove Stored Keychain Items:
- Open Keychain Access (found in Applications > Utilities)
- Select All Items under Category and ensure Login is selected under Keychains
- Type "BusyCal" in the search field
- Find all items that start with "BusyCal - Google..."
- Select all matching items and press Delete to remove them
- Quit Keychain Access
Re-authenticate with Google:
- Launch BusyCal and select View > Refresh Calendars (or press Command-R)
- When prompted, click Authorize via Web Browser
- Log into your Google account in the browser and click Allow
- If syncing multiple Google accounts, ensure you're authorizing the correct account
After clearing keychain items, BusyCal will rebuild the authentication tokens automatically during the next connection attempt.
Additional Troubleshooting Steps
For Google Workspace (GSuite) accounts:
- Contact your administrator to ensure third-party apps are not blocked
- Verify that CalDAV access is enabled in your organization's Google Workspace settings
For persistent connection issues:
- Clear your browser cache and cookies for Google services
- Try authenticating using a different web browser
- Temporarily disable VPN or proxy connections during setup
- Ensure your internet connection is stable during the authentication process
If sync continues to fail:
- Check Google's service status at status.google.com
- Wait 15-30 minutes and try reconnecting, as Google may temporarily rate-limit connections
- Consider using the PKG installer version of BusyCal if downloaded from a DMG file